I wrote about the specifics of charting slipped-stitch colourwork patterns in 2019, based on the functionality of Stitchmastery versions 3.0-3.1. If you’re using any of those versions, see that article https://stitchmastery.com/charting-slipped-stitch-colourwork-patterns-a-guest-post-by-kate-atherley/
This article is for those using version 3.2 or above, which introduced a new way of handling two-pass charts. See this article for an overview: https://stitchmastery.com/two-pass-charts-kate-atherley/
Slipped-stitch patterns are one of my favourite ways of working with two colours. You can create patterns that look very much like stranded colourwork or Fair Isle, but you only need to use one colour at a time. It’s fun to work, and the result is always rewarding. Where it can get a little confusing is that there’s a couple of different ways to do it.
The key thing, for any method, is that you use one colour at a time, and you need to work two passes to complete a row or a round. Let’s use vertical stripes as an example.
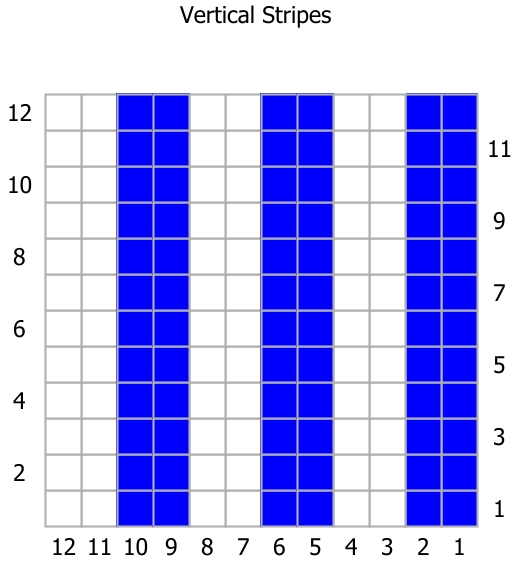
Looking at this chart, you would create this pattern with the stranded colourwork method by knitting two stitches with blue and then two stitches with white, alternating all the way across.
To create the same colour pattern with the slipped-stitch method, you would work across in two passes: once to knit the blue stitches, and once to knit the white stitches. When working with one colour, the other colour’s stitches are slipped rather than knitted (or purled if you’re on a WS row).
Many instructions for this type of colourwork have you complete two rows (or rounds) with one colour, before switching to the second – i.e. when working in rows, you go across both the RS and the WS rows with the blue, and then go across the RS and WS rows with the white, so that after four rows you’ve evened everything up, and each stitch has been worked twice.
This can be handled with a standard chart, as follows:

For knitting in the round, it looks like this:
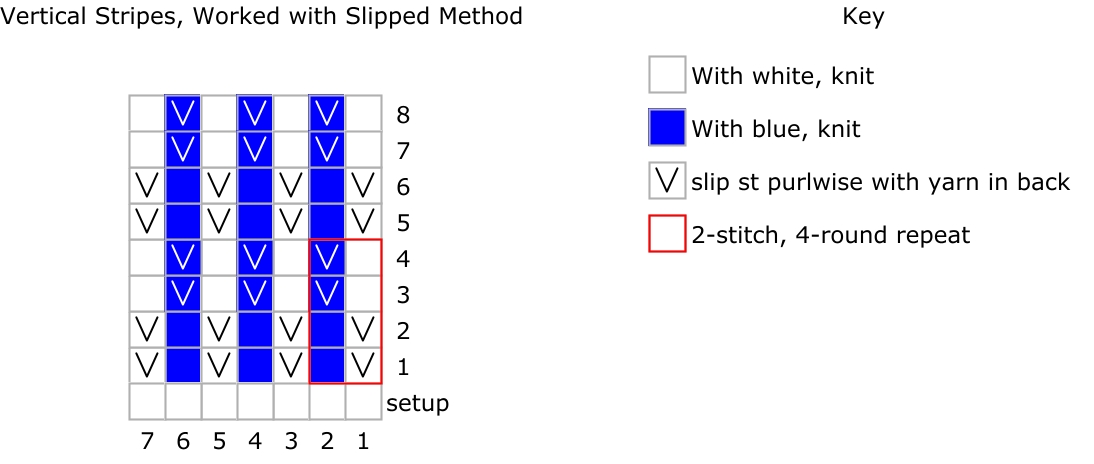
But some patterns handle it a different way: doing both passes on one side, before turning the work. For this example, on the RS row, you would go across with the blue yarn, knitting any stitches you wanted to be blue while slipping the white stitches. You then return to the start of the row and go across with the white yarn, knitting any stitches you want to be white, and slipping the blue stitches. And then you’d turn around to work the WS rows, and repeat the process, again beginning with the blue yarn.
Although the end result isn’t any different, some choose this method because they feel that the resulting fabric looks a little neater.
You do need to be using double-pointed or circular needles for this variant, as you have to return to the start of the row for that second pass. To create this type of chart, you will need to use the (new) two-pass setting.
These are the settings I would choose for this method:
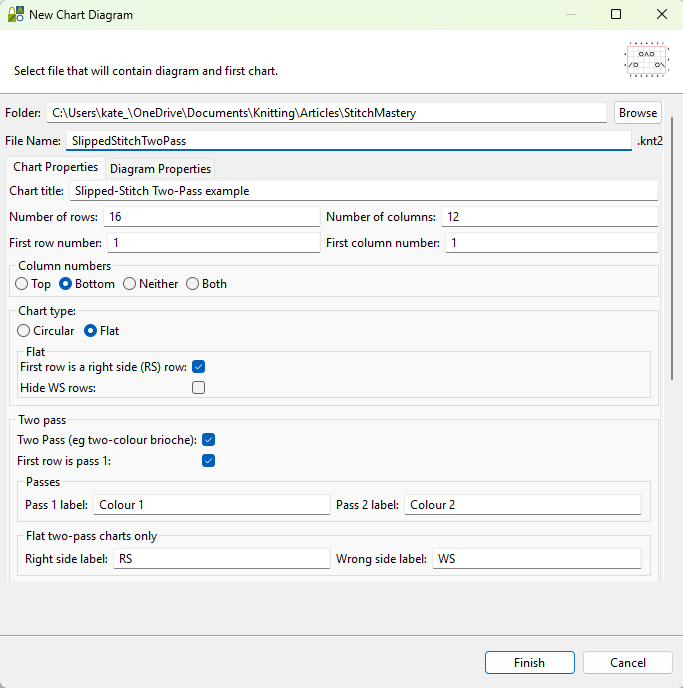
Check the “two-pass” dialogue box. For this example, the first row is pass 1. If you need a setup row that’s worked in one colour, uncheck this option.
I’ve set the colour names to be Colour 1 and Colour 2; the default settings of LC and DC (meaning light colour and dark colour – these are common in brioche, which is why they are suggested) aren’t always applicable for this type of pattern. You could also set them to be your specific colours, e.g. blue and white.
And instead of the default options for the RS/WS labels (LS and DS – light side and dark side) which work for brioche, I’ve used RS and WS, for right-side and wrong-side.
The resulting chart looks like this:
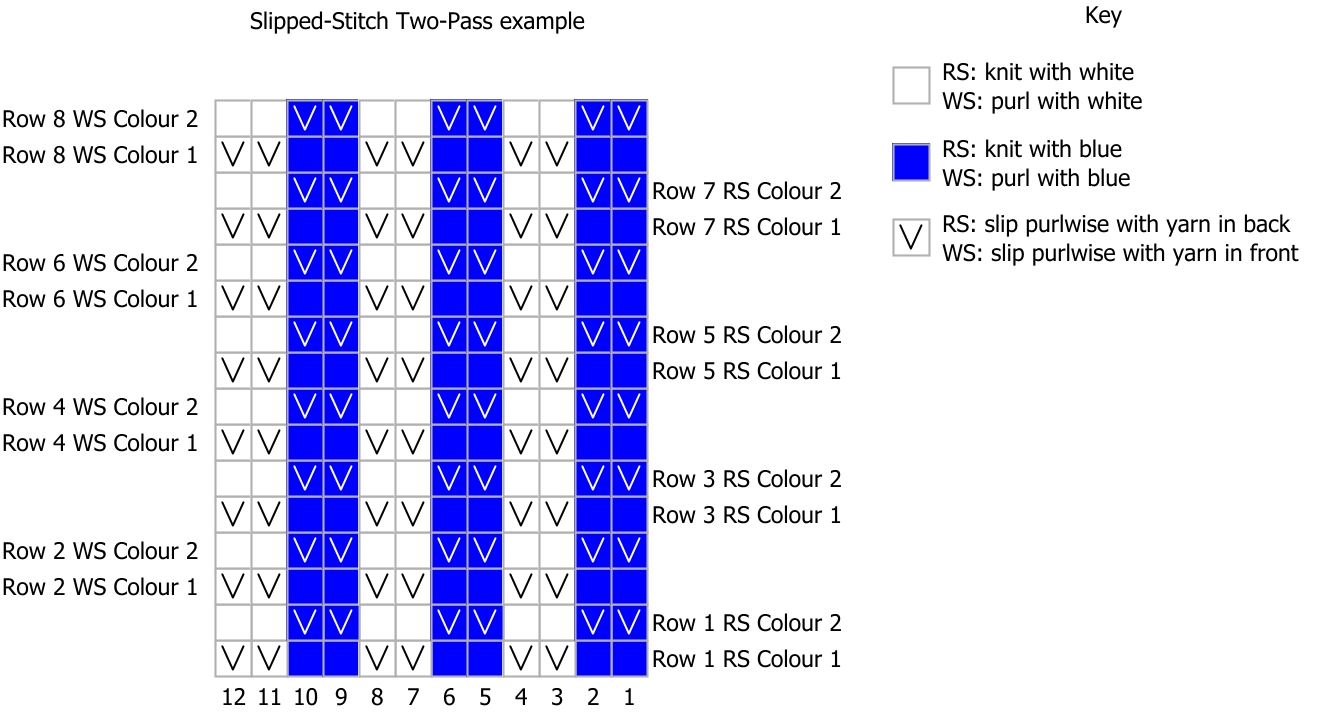
I have also made a couple of adjustments to the key to simplify and clarify the stitches. I’ve expanded the definition of the white and blue “stitches”. And I’ve expanded the definition of the slipped stitch, so it’s clear for both the RS and the WS movement.
(A small sidenote: I think patterns often offer “slip 1” as an instruction without sufficient information. It’s one of those stitches that’s obvious once you know what’s happening, but if you’ve not worked it before, or aren’t clear on how the stitch is being used within the stitch pattern, it can be a bit confusing. The general rule is this: unless it’s part of a decrease, any stitch to be slipped is to be slipped purlwise – that is, the needle should be put into the stitch as if to purl, so that when it’s moved to the right-hand needle, the stitch remains positioned correctly, with the right leg at the front. Slipping a stitch knitwise twists it and puts the left leg to the front. And unless otherwise specified, the yarn should be held at the wrong side of the work. On the RS, therefore, if a pattern just says “slip”, it’s safe to assume it’s intended to be done purlwise with the yarn held to the back; on the WS, it’s always purlwise with the yarn held to the front. Knitwise slips are used in decreases, to deliberately reposition a stitch.)
But no matter how you chart it, slipped stitch colourwork is a delight, and if you’ve not tried it, you should!
If you are still using Stitchmastery versions 3.0.0 to 3.1.0, please refer to Kate’s previous article on charting slipped stitch colourwork which will help you with the settings.